
Make a three point tool,
it is easier to use than a skew
and does a lot of the same things.
"Get the point with a pyramid tool."
| As I have noted before, one of my favorite things to enjoy in turning is to make my own tools. While there are a myriad of tools available in the catalogs, they amount to scrapers and cutters. The variety is a huge variation in tips, profiles, specialty steels and ingenious angles. One can spend a fortune on tools. However, in the past people made their own or had the local smith make them and then turned a handle. In fact, many turners such as myself either buy their tools unhandled or remove proprietary handles and make our own. | |
So the difficulty becomes working with metal. I was surprised to find that it is well within reach of most home workshops. The general tooling required is a drill, files, hammers, grinder, hack saw, vise, and propane torch. A drill press makes life easier but a hand model electric drill is certainly adequate. Mechanic's vises have a small anvil and a four inch or larger vise will have an anvil suitable for our purposes. For certain tools a metal tap is required but this is inexpensive and no harder to use than a screw driver.
For now I wish to describe the making of a three-point tool because I do not own one and wish to try one out. Instead of spending over thirty dollars to do so I decide to spend less than three and throw in fifteen minutes of fun. If you have not done much spindle turning, add another fifteen to twenty minutes of enjoyment.
Aside from your lathe you will need for this project
|

|
| Mount the wood for the handle between centers and turn to your favorite handle shape. If you are not sure what that is, try the feel of a couple of your lathe tools and shamelessly copy the one you like. I am using my monotube lathe from Canadian Tire and turning about 2500 rpm. |

|
| I like an elongated bead tapering to the tool shaft followed by a stretched out cove to a round at the end of the handle. I do not bother with a ferrule. Sand and finish as you like but I like a handle as it comes from skew or gouge. Finishes in my estimation are unecessary for a handle unless you plan to sell it and need it looking fancy. On the other hand I had a piece of rosewood next to the lathe so I used it to rub a little band of color at the end of the handle. Part the handle from the lathe. |

|
| Drill a 3/8" hole in the business end of the handle. I use a jig in the drill press for this but if you hold the handle in a bench vise and take your time, a hand drill will do. About an inch should be sufficiently deep for this tool. While the temptation is to bury that tool shaft as far as possible, it turns out that many of the tools we use have from one to four inches of shaft in the handle and an inch and a half is far more common than four inches. |

|
| Press fit the tool shaft into the handle. If the fit is a bit loose, glue the shaft in place. I like a polyurethane glue but a thick CA and a shot of accelorator will let us continue quickly. |

|
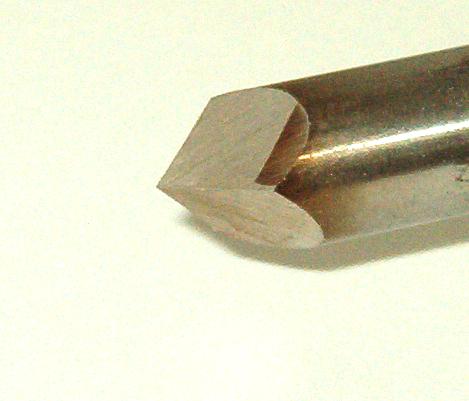
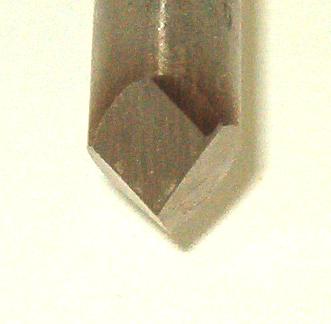
| Mark three evenly space dots around the perimeter of the shaft end and a dot in the center. Let us go to the grinder. Set your grinding table to about 150 degrees and with the two of the points parallel to the ground, i.e. the surface of the wheel, grind to center. You now have one mark opposite a flat. The edges of the flat are your other two marks. |

|
| Repeat the grinding with each of the remaining sides to give a tool with a center point and three cutting edges. |
|
|
Now to use the tool. Mount a piece of scrap on the lathe and round it down. I used a piece of the same block from which I cut the handle blank. Try a few beads. With a face of the tool facing up, lever the point into the wood. I found that it would comfortably cut a little way similarly to a parting tool and then it was easy to widen the "v" with little side plunges. Turning a bead seemed easiest by rolling the tool from the bottom of the "v" to the top in violation of everything I have learned in turning spindles, but it gives a great surface. Surface cuts like a skew are simple but coves are going to take a lot of practice. I will put this one into the spindle arsenal.

Have fun and let me know how it works out.
© 2015 copyright Darrell Feltmate, Around the Woods